Lesson 2: Excel Add-ins


Welcome to this second lesson!

Sorry, third lesson.

Hey tame imaginary skeptic, you're among us already. I'm not sure the Christmas Tree lesson really counts as a lesson, that is why I'll stick to two. Are you ready to voice the reader's own objections or queries?

Sure. That is why you pay me for, right?

Hmmm, let's just start.

Introduction

An add-in is software that adds new features into Microsoft Excel, e.g. in the form of new functions.

And why would I need that? Excel already has plenty of functions available.

Sure, but from time to time it might be handy to create your own, and distribute it among your friends or colleagues. Suppose you need in your organisation a function that performs some string manipulation: putting everything in uppercase, replacing some characters by others etc. You can create an add-in that combines all these activities into one single function. It's a stupid example I know, but the essence is that an add-in can perform (almost) anything. You just have to program what it should do.

In VBA you mean?

Yes, so you'll need to have some programming skills. But Excel helps a lot thanks to its macro recording functionality.

But if I coded the functionality already, why would I need to convert it to an add-in?

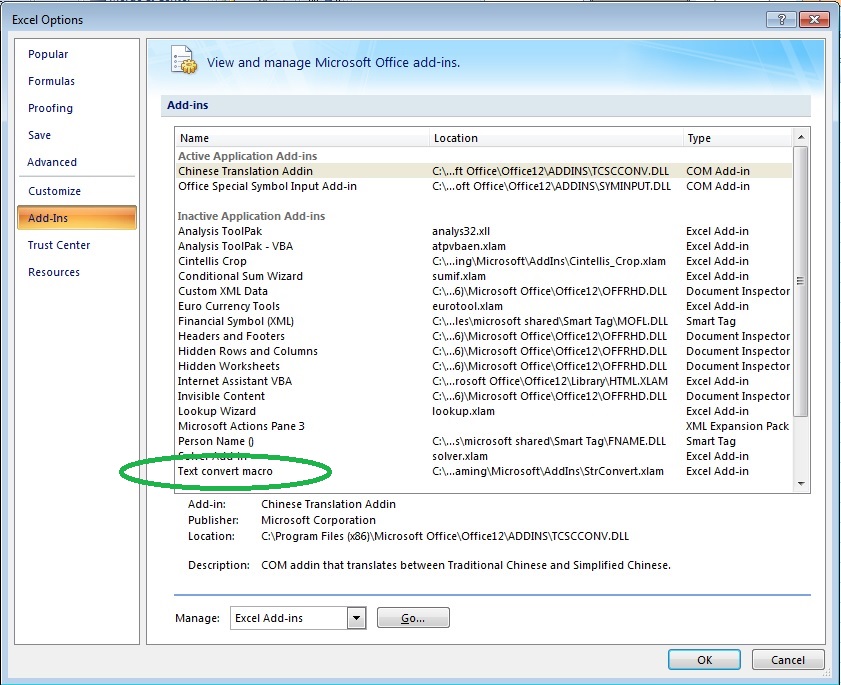
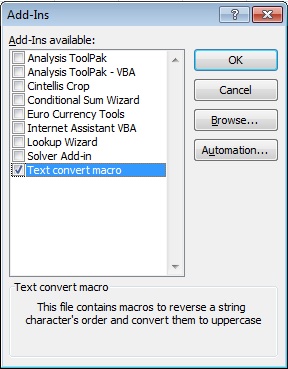
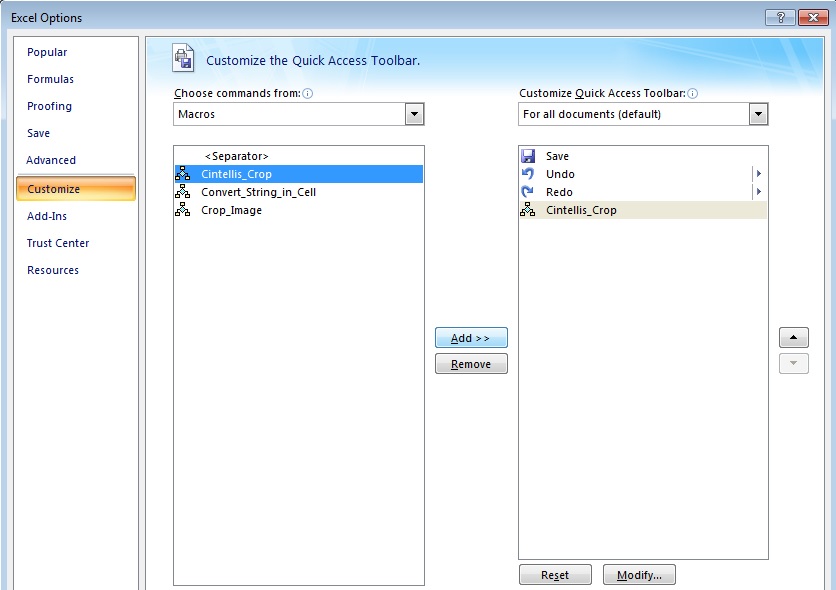
Good remark. Because a piece of VBA code is confined into your workbook itself. You cannot use it in other workbooks. By creating an add-in, you export this functionality and make it available to every workbook you'll use. Moreover, you can just send it to anyone you'll want and the functionality will become available to them as well.

Add-ins explained

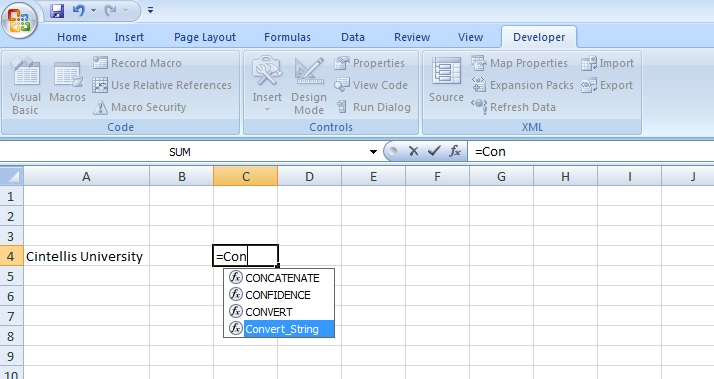
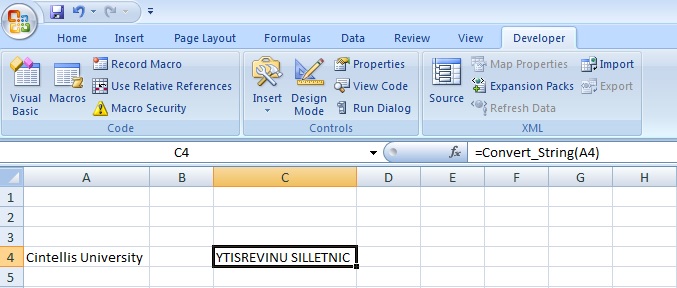
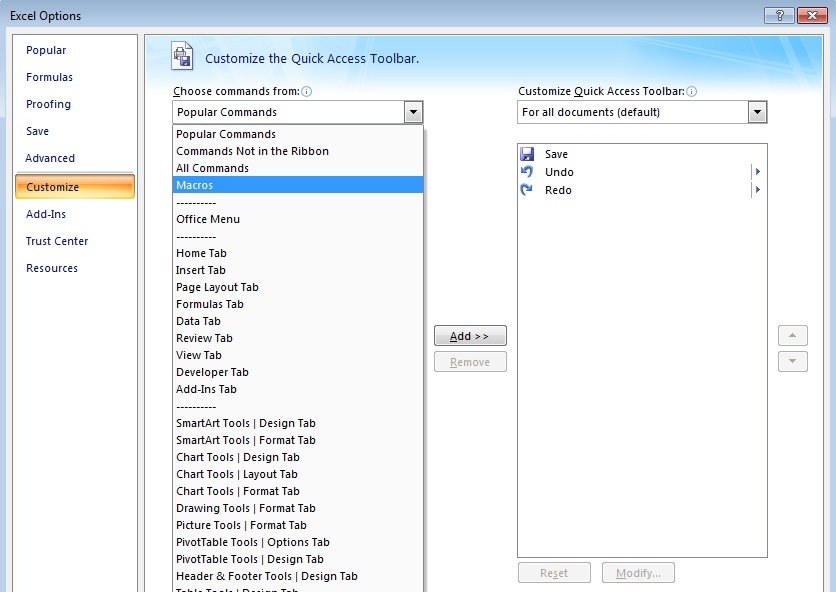
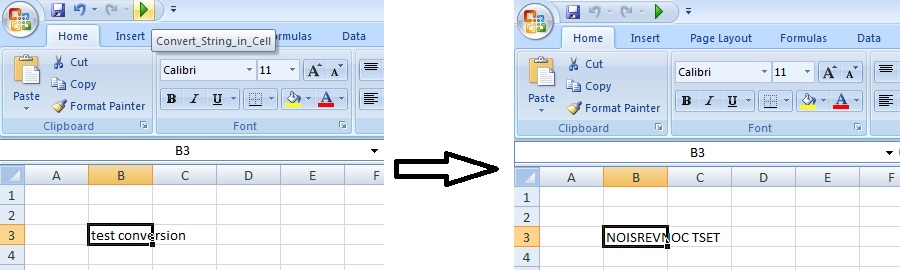
I'll be quite fast on the VBA part, as we'll assume the reader has some VBA knowledge already. If not, we're just a phone call or e-mail away... Let us first create a user defined function, converting a string in uppercase and reversing the character's order.

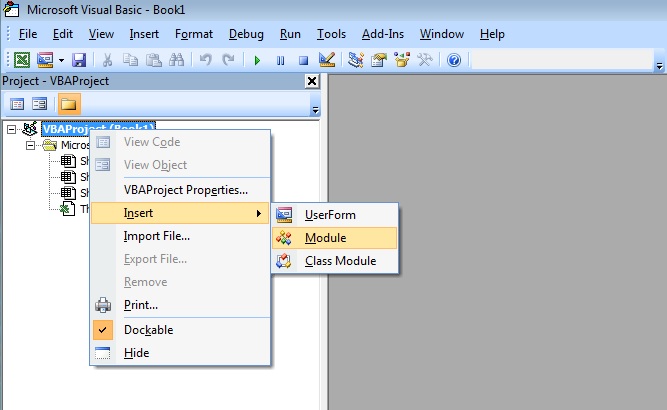
Open the VBA Editor via "ALT + F11" and insert a New Module as shown below


Our code looks as such:

Public Function Convert_String(String_to_Convert As String) As String

        Convert_String = StrReverse(String_to_Convert)
        Convert_String = UCase(Convert_String)

End Function


We just created a new Excel function called Convert_String, taking a "String_to_Convert" as input parameter and returning a string as well. First we reverse the characters using the StrReverse VBA function after which we apply the VBA UCase function. Period. This is what is called a user-defined function.

Can't you combine both into one single line using something like Convert_String = UCase(StrReverse(String_to_Convert)) ?

Yes, probably you can. But for the sake of clarity, we split it. Anymore annoying comments?

I just wanted to help.

Case closed.

OK, how do I use that function into my worksheet?

In the exact same way as you're using the already existing Excel functions. When typing a formula into an Excel cell, you'll notice that the Convert_String formula will appear:


And you can apply it to any cell in your document:


This is funny, but not really helpful. If I understood it well, this code is embedded into the workbook itself. I won't be able to use it in other workbooks.

That is absolutely correct, but this is where add-ins come in handy. But before creating the add-in, I'll add a second macro doing exactly the same but using the active cell value. This is now our code:

Public Function Convert_String(String_to_Convert As String) As String

        Convert_String = StrReverse(String_to_Convert)
        Convert_String = UCase(Convert_String)

End Function

Public Sub Convert_String_in_Cell()

        ActiveCell.Value = StrReverse(ActiveCell.Value)
        ActiveCell.Value = UCase(ActiveCell.Value)

End Sub


I am not sure why you need the last procedure, the Convert String in Cell thing...

Patience my friend, patience.

Let us now, before saving the above code as an add-in, add some properties: who is the author, what is the purpose of the add-in etc. This will later on enable users to know what the add-in is about. All of these can be defined in the document properties:


After which the file can be saved as .xlam, which is the add-in extension.


When selecting Excel Add-in as Save As file type, Excel automatically modifies the path to save the file in to the default Add-in folder, which can differ from version to version. Nevermind, this is where the add-in should be stored.

And now I can use it everywhere!

Patience again my friend, patience. But we're pretty close now.

You still need to install the add-in. In the Excel Options Dialog Window (the way to reach there again differs from version to version), you need to select the Add-Ins option in order to see which add-Ins are already installed and active (these are the "Active Application Add-ins"). In green I highlighted our "Text convert macro", that Excel automatically recognized as it has been stored as an add-in file in the correct folder. However, it still appears in the "Inactive" section.


To activate it, you need to go to the Manage section (in the example above via the "Go" button) and highlight the required add-in. You'll as well see that the descriptiopn we entered as well appears in the dialog box.


And now we're done?

Yes, now we're. As soon as the add-in is installed its functions will be available in Excel. In other words, the functions can be used in any document. The add-in will remain installed until you return to the add-ins dialog and uninstall it by removing the tick from the check-box. There's one more thing though...

No please no!

But it's going to ease your life. Please read next chapter.

The Quick Access Toolbar

The Quick Access Toolbar (QAT) is the set of frequently used icons situated in the top left corner of your Excel window:


Now just suppose you need to convert a string every 5 minutes. Instead of manually launching your macro every time, you can add your function to the QAT. Click on the small arrow next to the QAT and choose "More Commands...":


In the "Choose commands from:" Combobox, select "Macros":


You should then see your procedure "Convert_String_in_Cell" appearing. Just add it to the Listbox situated on the right side of the Dialog (Tip: you can as well modify its icon).


When done, the function is now available in the QAT. When a cell is selected, a click on the icon now automatically converts the string, and that is why we needed our second procedure:


Please always keep in mind that:

  • A custom function that is located in a module within a workbook itself travels with the workbook. So, if you send the workbook to someone else, the function will be available in that workbook;

  • If the workbook uses a function contained in an add-in, the workbook will need the add-in. So both files (workbook and add-in) are needed;

  • In the unlikely event that you'll want to use that function in the code of another workbook, you'll need to reference the add-in, but that'll be for another lesson...

  • You can also add a description to your own function's arguments. We however won't elaborate on that aspect here as this isn't really add-in related information.

  • The QAT is not add-in only! It can be used as well to store the existing Excel functions you frequently use.


Extra: Crop add-in

It appears that the crop functionality (for OLE objects but some other types as well) does not work anymore since Excel 2010, where it used to work perfectly under 2007. A quick chat with Microsoft support learned that... well didn't learn a lot, except that "some functionalities disappear from one version to another while other functionalities are introduced or receive an update".

Some resources can be found online to bypass the problem but none are really satisfying. To solve this, we've created an add-in that can be downloaded for free here.

How do you use it? After having saved the file in the correct default add-in folder, the easiest way is to add it to your Quick Access Toolbar: The Cintellis_Crop Sub should be used:


What's next? First select the picture you want to crop and click on the icon you just added to the toolbar. The sub will draw a rectangular shape around your picture. Resize the rectangular shape, its new size will be used to crop the picture. Click again on the button on the toolbar and the picture will be cropped.

We appreciate your feedback!


About Cintellis

Let us surprise you with how much more you can achieve by using Excel and VBA based products.

Are you looking for an on the level, reliable and trustworthy company that will surprise you with how much more you can achieve by using Excel and VBA based products? Learn more about our philosophy, products, services or contact us for more info.


About Numis

Flexible, cheap and very short implementation time, discover Numis, our Excel based Cash Management and Management Accounting Software and experience a totally new way to analyse and report on your cash positions.

At Numis, we help you to get more out of your financial data than you thought possible. From enhanced reporting functionalities and detailed analysis to providing enterprise budgeting and forecasting solutions, we will help you to achieve your business objectives. When using Numis, you can share your analysis and strategy with your business partners, suppliers or employees as needed.

Numis is a product from Cintellis bvba & FS&P bvba.

CONTACT Us

You can contact us by phone, mail or by filling out the form below.

Corporate address:
Alsembergsesteenweg 588
1653 Dworp
Belgium

Phone Numbers:
+32 (0)471 65 19 66

E-Mail: info@cintellis.com